Luluizm

I love making granny squares. I have so many of them. I'm planning to make blanket out of them. Right now, I'm just tasting the water, trying to decide which one I want to finish first. I LOVE this pirate set!

Most time spending on the details!


Free Pattern here!
Luluizm


These are my test squares... I have lots of green ones because I think it's the perfect color to go with the final  project. I might use the orange, but the hot pink seems too dark, I may not use it on the finished project or maybe used it for other project with different shade of pinks to make a pinky blanket.

I might do the first petals in different colors with the second petals... I haven't decide what I want to do with them yet. Just tried a few more different test squares before I can decide!

I just got the yellow yarn today and took the picture and changed the original picture which didn't show the yellow square.

Free Pattern here!

Luluizm

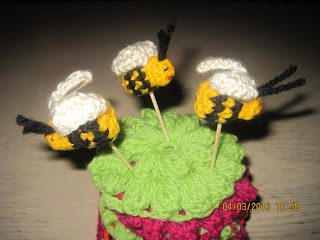
I friend asked me if I can make a bee as big as a quarter. I said I will looked for the pattern on the internet.

I found this FREE PATTERN here!

I just made them smaller than what the pattern called for. Now I made lots of them for my yarn garden! LOL

Luluizm

As promised, I made a whole bunch of these Octopus in different colors. I made a row of rainbows for the back of my car with different eyes to give its own characters!


Free Pattern for the Octopus here!
Luluizm

A friend asking me to make this from the FREE PATTERN here!

I just made the chick/duckling without the hat or boots. She's only about 2.5 inch. I used B hooked (2.25 MM hook) and a size 3 worsted yarn. The beak made out of orange felt and pipe cleaner for the feet.
Luluizm

I had FUN making more of these key-chain OWL for giveaway.


Luluizm


Body:
Rnd 1: Starting at bottom of body, with yarn and Hook, make an adjustable ring, ch 1, and sc 6 into the ring.  Pull closed.
Rnd 2: Work 2 sc into each st (12)
Rnd 3:  Working in back loops of each stitch only (BLO), sc into each st (12)
Rnds 4-7: Sc into each st (12)
Rnd 8: (2 Sc into next st, sc into next 5 st)* rep to end of round (14)

Fasten off and leave a long tail for sewing. Stuff the owl. Thread the yarn needle with the yarn tail. Flatten the top edge so that you have one long seam of 7 st to sew through. Whipstitch the seam closed, knot the yarn tail and hide within the body of the owl, clipping the tail close to the surface.

Finishing:
Cut a small egg shape from the fabric for the owl’s tummy. Glue or sew the patch onto the owl. Cut a small triangle from felt and glue to owl for the beak. Glue or sew two button eyes to the owl’s face.

I used small gauge of hook and yarn, so my owl only as big as a quarter.

Luluizm

My mom loves cats. I was talking with her on skype a lot because we separated thousands of miles away. I love Chococat from Hello Kitty trademark, so I just looked for random free crochet pattern for cat on the internet. I only did the head because I want to hang it on my car. Voila!

Head:
Rnd 1: sc 6 times in adjustable loop (6 sc)
Rnd 2: [2 sc in ea sc ] arnd (12 sc)
Rnd 3: [2 sc in next sc, sc in next sc] arnd (18 sc)
Rnd 4: [2 sc in next sc, sc in next 2 sc] arnd (24 sc)
Rnd 5: [2 sc in next sc, sc in next 3 sc] arnd (30 sc)
Rnd 6: [2 sc in next sc, sc in next 4 sc] arnd (36 sc)
Rnd 7 – 11: [sc in ea sc] arnd (36 sc)
Rnd 12: [2 sc tog, sc in next 4 sc] arnd (30 sc)
Rnd 13: [2 sc tog, sc in next 3 sc] arnd (24 sc)
Rnd 14: [2 sc tog, sc in next 2 sc] arnd (18 sc)
Stuffed
Rnd 15: [2 sc tog, sc in next sc] arnd (12 sc)
Rnd 16: [2 sc tog] arnd (6 sc)
F.O.

Chococat Ears (make 2)
Joining to first st after every round: sl st, Ch1
Rnd 1: sc 6 times in adjustable loop (6 sc)
Rnd 2: [sc in ea sc] arnd (6 sc)
Rnd 3: 2 sc in first sc, [sc in next sc, 2 sc in next sc] twice, sc in last sc (9 sc)
Rnd 4: 2 sc in first sc, [sc in next sc, 2 sc in next sc] arnd (14 sc)
F.O.

Finishing:
Cut 2 small white and black circles from felt for the eyes. Small yellow oval felt for the nose and two beige color felt in the shape for the inner ears. 6 stripes of black felt for the whiskers. Glue or sew them to the cat’s face.

I used small gauge of hook and yarn, so my cat is pretty small to hang on the car mirror.


Luluizm


I originally want to make a slipper out of the pattern I found on the internet. I want it colorful, so I start making the panels with burst of colors. But then my son said it's too nice to put it on my feet and got scuff marks, so he suggest to make it as a blanket instead. So, here I am started making circles at dentist appointments, doctor appointments or just waiting in the car for my kids to get off school.


Luluizm


I will add free pattern later when I have time writing it down.

Thanks for checking this out!
Luluizm


Free pattern here!

Thanks Wayuki
Luluizm

Free pattern for the beanie hat with flaps here!

I used Vanna's Choice Lion Brand Mustard color for the basic beanie.
The black border from Craft Smart.
White eyes from Red Heart Super Saver.

For Jake face, I follow the pattern from this Amigurumi Jake pattern with some modify sizes to fit the beanie hat. The ears I used my own modification, because I want it floppy and not as heavy as the pattern called for. I basically used double crochet as the flaps from the beanie pattern and shaped them to look like ears.
Luluizm


You will need:
Some yarn, whatever colour you want your teddy to be.
A little black yarn to embroider features.
3.5mm hook.
Stuffing.

Round 1: Ch 2, 6sc in 2nd ch from hook.
R2: (with ears) [2 sc in 1st stitch, 2 sc in 2nd stitch, 3 dc bobble st and sc in 3rd stitch, repeat in next 3 stitches making 12 stitches in total].
R3: 12 sc.
R4: 12 sc.
R5: [Dec 2 (work 2 sc together), sc] around (8 st).
R6: [Inc 2 (work 2 sc into 1 st), 3 sc] around (10 st).
R7: (with arms) 4 dc popcorn st, 3 sc, 4 dc popcorn st, 5 sc.
R8: 10 sc.
R9: 6 sc, inc 2, 2 sc, inc 2 (12st).
R10: 12 sc.
R11: (with legs) 1 sc, 4 dc popcorn st, 3 sc, 4 dc popcorn st, 6 sc.
R12: 12 sc.
R13: Dec 2 around (6 sc).
FO.
Stuff & embroider features using black yarn. Sew hole shut and pull yarn up into body to make sure the bottom is flat.

Thank you Angry Angel  for the free pattern!
Luluizm


Red Yarn using Red Heart Soft 
Yellow Yarn using Patons Astra
Off White Yarn using Red Heart Soft
Sparkly Purple Yarn using Loops & Threads


My revisions to the pattern:
  1. I made a little cape that can be worn as a cape as in picture one or if put in the front, it looks like the Little Princess wear a long dress as in the last picture.
  2. I made the hair in different length around the head and the top wig broader than the pattern calls for.
  3. I added beads to adorn the tiny crown.
  4. I didn't make the legs because I like the way the dress helps her stand on it's own, or the ears because her long curly hairs will hide the ears part anyway. 
All in all I'm really happy with the end result. No body helping me with the pattern. The part with her dress really got me confused, because I never done it before, but I watch lots of youtube videos and realized that the pattern called for shell stitches.

Well, I really enjoy making this doll, because it small enough to finish in a small amount of time!

Luluizm

I'm so happy I finally received my safety eyes today. I mail order it from Bears & Bedtime because no stores  close by selling them. I have different sizes and different kinds. I was practically jumping up and down when I saw the envelope on my mails. Now I can make proper amigurumi!!!